
 You are about to leave publix.com and enter the Instacart site that they operate and control. Publix’s delivery and curbside pickup item prices are higher than item prices in physical store locations. Prices are based on data collected in store and are subject to delays and errors. Fees, tips & taxes may apply. Subject to terms & availability. Publix Liquors orders cannot be combined with grocery delivery. Drink Responsibly. Be 21. For prescription delivery, log in to your pharmacy account by using the Publix Pharmacy app or visiting
 Try these advanced pumpkin carving techniques that are sure to impress the little goblins in your neighborhood.
Checkerboard Pumpkin
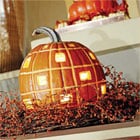 This whimsical checkerboard pattern makes a pumpkin pretty enough for a table centerpiece.
- Cut the top off your pumpkin and scoop out the seeds and pulp.
- Following the grooves running vertically down the pumpkin, use a wood chisel to gently remove the skin to form narrow lines.
- Chisel horizontal lines around the pumpkin about the same distance apart. The deeper you chisel, the more light will shine through the shell.
- Finish the checkerboard design by carving square holes in every other box.
Star Light, Star Bright Pumpkin
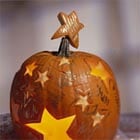 Cookie cutters are the secret to success in crafting this pumpkin. Try other shapes for different looks.
- Cut off the top third of the pumpkin using a sharp knife. Clean out the pulp and seeds.
- Using a cookie cutter, score several large star shapes into the pumpkin. Remove the cookie cutter and use a paring knife to finish cutting out the shapes.
- Add the small star shapes by pressing a smaller cookie cutter part way into the skin, being careful not to press it all the way through the rind. Then use a paring knife to remove the outer layer of the pumpkin skin, leaving a thin layer of rind to let light shine through.
- To further embellish your pumpkin, use a gold marking pen to outline the stars and draw squiggles or other designs of your choice.
- Insert a toothpick into one of the leftover star-shape pieces of rind. Draw designs on the piece, if desired. Then insert the toothpick into the stem.
For a fun and safe Halloween, always supervise children while they carve their pumpkins.