
 You are about to leave publix.com and enter the Instacart site that they operate and control. Publix’s delivery and curbside pickup item prices are higher than item prices in physical store locations. Prices are based on data collected in store and are subject to delays and errors. Fees, tips & taxes may apply. Subject to terms & availability. Publix Liquors orders cannot be combined with grocery delivery. Drink Responsibly. Be 21. For prescription delivery, log in to your pharmacy account by using the Publix Pharmacy app or visiting
 Step 1 — Gather your tools.
Minimize the mess and make carving easier with the following tools:
- newspapers to cover the work surface
- bowl or plastic bag for seeds and pulp
- sharp knife or small saw
- spoon or ice cream scoop
- pumpkin stencils
- knitting needle or poker tool from purchased pumpkin carving kit
- marker or felt-tip pen
- grapefruit spoon, rounded gouge, wood chisel, or crafts knife (optional)
- small candle (optional)
Step 2 — Draw and carve the lid.
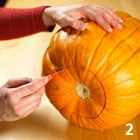 Remove soil or other debris from the surface of the pumpkin with a moist, soft cloth. Draw an outline of a lid around the stem (or cut a hole in the bottom of your pumpkin so you can simply place it over a light source). It's helpful to draw a notch so you can easily tell where to replace the lid when you take it off. Make the lid large enough to get your hand inside the pumpkin (and so you can place a light source inside).
Carve out the lid of the pumpkin with a saw or sharp knife. Make your cuts at an angle toward the middle of the pumpkin so the lid stays on and doesn't drop through the hole. To place the light through the bottom, simply cut a hole from the base.
Step 3 — Remove the seeds and pulp.
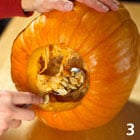 Use a spoon or ice cream scoop to remove the seeds and pulp. Scrape out enough pulp so the walls of the pumpkin are an inch or so thick.
Step 4 — Transfer the pattern.
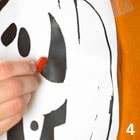 If you are using a template, reduce or enlarge it with a photocopier to match the size of your pumpkin. Tape the template to the outside of the pumpkin, then use a poker tool (available in pumpkin carving kits) or the pointed tip of a knitting needle to score the design onto the pumpkin. Do this by punching guide holes through the paper (be sure not to push all the way through the wall of the pumpkin.) Or draw your own design on the pumpkin with a marker or felt-tip pen.
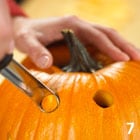
Step 5 — Cut out the pattern.
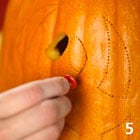 Cut out the scored design with a saw or small knife. For small openings, use a fine-tooth saw (available in pumpkin carving kits). Gently saw in a continuous motion at a 90-degree angle from the pumpkin. Too much pressure could break the saw or pumpkin wall. When you reach a corner, remove the blade and insert it at the new angle. Don't try to twist the blade. Once you've sawed out an area, carefully push the piece out from the inside.
Step 6 — Make special effects (optional).
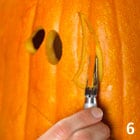 An advanced technique is to remove the skin without cutting holes in the pumpkin. Use a grapefruit spoon, rounded gouge, wood chisel, or crafts knife to remove the skin. Cut as much skin and pulp as necessary to obtain the look you desire. Remember, the more skin and flesh you remove, the more light will shine through.
Step 7 — Illuminate Your pumpkin.
 If you use a candle inside your pumpkin, light it after the carving is done. If the candle blackens the inside of the pumpkin, make a 1-inch-diameter hole in the blackened area to vent the heat. Make your pumpkin last longer by coating the cut edges with petroleum jelly. If your pumpkin starts to shrivel, revive it by soaking it in water for several hours. After you remove the pumpkin, let it drain and dry so it doesn't rot.
Note: Never leave a burning candle unattended or in the reach of children.
For a fun and safe Halloween, always supervise children while they carve their pumpkins.